A time-out occurred while communicating with the server 0x800ccc19
You might face Error “A time-out occurred while communicating with the server 0x800ccc19” while sending or receiving email in your outlook application. A time out error in Outlook occurs when there is no response received from the server to the outlook email client. There are different factors responsible for these time out error code 0x800ccc19. Follow the below steps to fix the issue with time-out error.
The error message seems to be like:
A time-out occurred while communicating with the server 0x800ccc19
The main reason for the internal error code 0x800ccc19 are
- Incorrect Credentials: Usage of incorrect username and password can be a likely reason. Make sure that the password you are trying to put belongs to the same email account. If an Outlook application is unable to match or sync the details, it will throw error “A time-out occurred while communicating with the server 0x800ccc19”.
- External Applications: Firewall or Anti-Virus may also block the email access or other application functions. It is recommended to temporarily disable the firewall and anti-virus for the configuration function.
- Change in Port Number: Incorrect outgoing port number may also generate the error. There is also a possibility that your ISP has blocked the port of the particular email provider. It can be figured out by changing the port.
 Click here to chat with an expert technician.
Resolution:
In order to fix the issue we can separate the POP3 accounts into smaller groups to make the Send/Receive process easier. Once groups are create one can access the group separately.
 Click here to chat with an expert technician.
Follow the steps to fix the error 0x800ccc19:
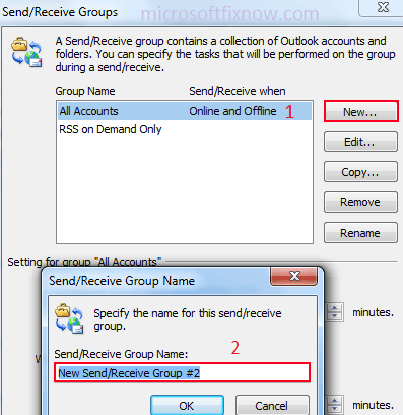
- Open Outlook application and click “Send/Receive”, goto “Send/Receive groups” and then select the Define Send/Receive Groups.
- Another pop-up will open, click New and under “Send/Receive Group Name” box give a name to the group.
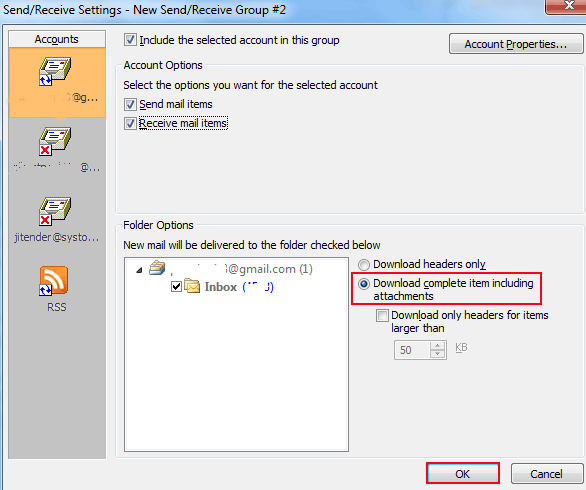
- Under this new pop-up, choose the Accounts for which you want to create this group. You can choose more than one account as well and then select the “Include account in this send/receive group” checkbox.
- Select “Send Mail Items” and “Receive Mail Items” check box.
- Click “Download complete item, including attachments” and click “OK”.
- You can create many such groups for small groups of accounts and once done, click “Close”.
Now to send or receive email for each group, go to Tools, point to Send/Receive and click the required name of the group.
 If the issue is not fixed, Click here to chat with an expert technician for better assistance.


